Labels For Mason Jars are essential for organizing and identifying contents. Additionally, they can add a personal touch or enhance the presentation of homemade goods. For instance, creating your own labels allows you to customize the design to fit your specific needs, whether for personal use or for a small business. Thus, understanding how to make labels for mason jars can be both a practical and creative endeavor.
Understanding Mason Jar Labels
What Are Labels for Mason Jars?
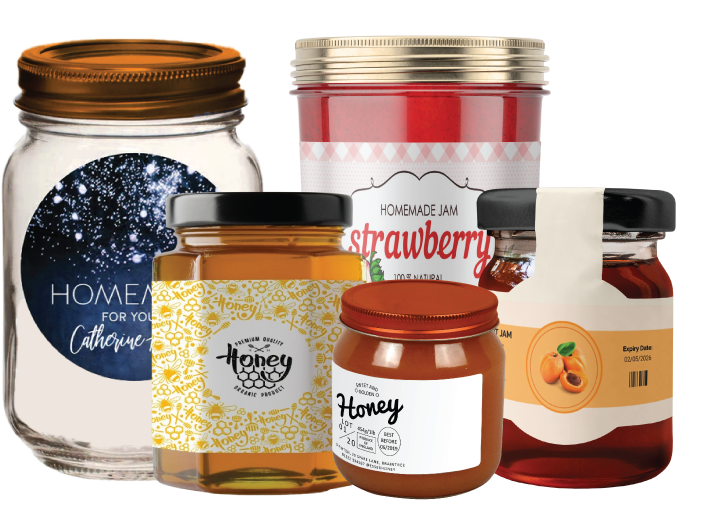
When it comes to mason jars, labels are adhesive tags designed to stick to their surfaces. Typically, they provide information about the contents, such as ingredients, expiration dates, or other relevant details. Moreover, labels can also serve decorative purposes, adding a stylish or personalized touch to the jars. Thus, having well-designed labels helps in both organizing and presenting your jars effectively.
Benefits of Custom Labels
First, custom labels allow you to create a unique look that matches your personal style or brand. Second, they provide clear information about the jar’s contents, which is especially useful for preserving and organizing. Third, labels can enhance the overall appearance of the jars, making them suitable for gifts or sale. For instance, a beautifully designed label can transform a simple jar of homemade jam into a thoughtful gift.
Designing Your Labels for Mason Jars
Choose the Right Material
Initially, select the appropriate material for your labels. Commonly, labels are made from paper or vinyl. Paper labels are often used for indoor purposes and are easy to print at home. On the other hand, vinyl labels are more durable and water-resistant, making them suitable for jars that may be exposed to moisture. Thus, choosing the right material will ensure that your labels last and remain legible.
Design Considerations
To begin, consider the design elements you want to include on your labels. Typically, this includes the text, colors, and any images or graphics. Additionally, make sure the text is clear and easy to read. For example, use a font that is large enough and contrasts well with the background color. Also, incorporate relevant details such as the contents, date, and any special instructions. Moreover, adding decorative elements can make your labels more attractive.
Using Design Software
Generally, using design software can help you create professional-looking labels. Popular options include Adobe Illustrator, Canva, or even Microsoft Word. Such software allows you to customize templates or create your own design from scratch. Thus, experimenting with different designs can help you find the perfect look for your mason jar labels. Additionally, many of these tools offer pre-made templates that you can easily adapt to your needs.
Printing Your Labels
Selecting a Printer
Just choose a reliable printing company that offers high-quality materials and finishes. In addition, ensure they can handle custom sizes and shapes. For instance, a company specializing in custom packaging can provide various options for paper stock and finishing. Furthermore, inquire about their capability to handle large print runs if you plan to distribute a high volume of labels.
Printing Tips
Before you start printing, do a test run on a small scale. Additionally, check the alignment and color accuracy to make sure everything looks as expected. For instance, printing a test sheet will help you identify any issues with the design or settings. Thus, making adjustments before the final print can save you time and resources. Moreover, ensure that the labels are cut accurately to fit your mason jars.
Applying Labels to Mason Jars
Preparation
Remove any dust or residue from the surface of the mason jars before applying the labels. Additionally, make sure the jars are completely dry before applying the labels. Thus, preparing the jars properly will help the labels adhere better and avoid any peeling or bubbles. Moreover, aligning the labels carefully will ensure they look neat and professional.
Application Process
To apply the labels, peel off the backing and carefully position the label on the jar. Generally, it’s best to start from one edge and smooth it out towards the other to avoid air bubbles. Additionally, press down firmly to ensure the label sticks well. For instance, using a credit card or similar tool can help smooth out any air bubbles and ensure a smooth application. Thus, proper application will result in a clean and professional finish.
Custom Labels and Their Impact
Advantages of Custom Labels
Firstly, custom labels allow you to create a unique identity for your jars. Secondly, they can convey important information in a clear and visually appealing way. Thirdly, well-designed labels can enhance the overall presentation, making them suitable for gifting or selling. For example, a custom label on a jar of homemade cookies can make it look more enticing and personal.
Measuring Success
Gauge the effectiveness of your labels by considering feedback from recipients or customers.Additionally, monitor how well the labels adhere to the jars over time. Thus, assessing both the visual appeal and practical performance will help you make any necessary improvements. Moreover, regularly updating your labels based on feedback can help maintain their effectiveness.
Conclusion
Creating labels for mason jars can be a rewarding and practical task. By choosing the right materials and design elements, you can make labels that are both functional and attractive. Moreover, incorporating custom labels adds a unique touch that enhances the presentation of your jars. In summary, with attention to detail and the use of effective Product Packaging Solutions, your labels can significantly improve the organization and appeal of your mason jars.