Installing a wood-burning stove in your home can transform your living space, offering both warmth and a rustic, cozy atmosphere. Beyond aesthetics, a wood stove can also improve energy efficiency and reduce reliance on central heating. However, installation requires careful planning and strict adherence to safety guidelines.
This comprehensive guide will walk you through the essential steps to properly install a wood-burning stove. From selecting the right stove to understanding building codes, this guide will ensure a smooth and safe installation. For high-quality stoves, accessories, and expert guidance, Caledonian Stoves is a top choice for homeowners looking to install wood-burning stoves.
Why Install a Wood-Burning Stove?
Before jumping into the Wood burning stove installation process, it’s important to understand the benefits of adding a wood-burning stove to your home:
- Energy Efficiency: Wood-burning stoves are highly efficient heating solutions. Modern stoves convert up to 80% of the energy from wood into heat, compared to traditional open fireplaces, which are much less efficient.
- Eco-Friendly Heating: When sourced sustainably, burning wood can be carbon-neutral, as trees absorb carbon dioxide during their growth, balancing the emissions released when the wood is burned.
- Lower Heating Costs: With rising energy prices, a wood-burning stove offers an affordable alternative to heating your home, especially if you have access to inexpensive firewood.
- Independence from the Grid: A wood-burning stove works independently of electricity or gas, providing reliable heat during power outages or extreme weather conditions.
- Aesthetic Appeal: A wood stove adds character and ambiance to any room, serving as a functional centerpiece for cozy, winter nights.
Step 1: Choose the Right Stove for Your Home
The first step in your wood-burning stove installation is choosing the right stove to suit your needs. Factors to consider include:
- Size and Heating Capacity: The size of the stove should match the space you intend to heat. Measure your room and choose a stove with the appropriate British Thermal Unit (BTU) output to ensure adequate heating. A stove that’s too small won’t heat the space effectively, while one that’s too large can cause overheating.
- Efficiency Rating: Look for a stove with a high efficiency rating (typically between 70% and 80%). Higher efficiency means the stove will burn wood more effectively, providing more heat and using less fuel.
- Style and Material: Wood-burning stoves come in various styles, from traditional cast iron to sleek modern designs. Choose a model that fits your home’s aesthetic and meets your practical needs.
If you’re unsure which stove is the best option for your home, Caledonian Stoves offers a wide range of premium wood-burning stoves and can help you select the perfect model.
Step 2: Check Local Building Regulations and Permits
Wood-burning stove installations are subject to local building regulations and safety standards. It’s crucial to follow these rules to ensure your stove is safe to use and meets legal requirements.
- Permits: Most areas require a permit for wood-burning stove installation. This ensures that the installation complies with fire safety regulations.
- Building Codes: These codes often dictate how the stove should be vented, the required distance between the stove and nearby walls or furniture, and the proper chimney height for safe operation.
- Post-Installation Inspection: Some jurisdictions require an inspection by a certified professional to confirm the installation was done correctly.
Adhering to local building codes and regulations is vital for your safety. Caledonian Stoves can provide guidance on navigating these rules to ensure your installation meets all requirements.
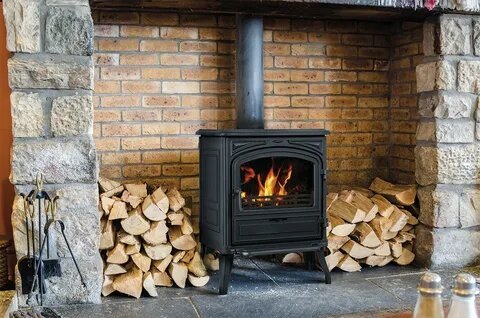
Step 3: Select a Safe Location for Your Stove
Choosing the right location for your wood-burning stove is essential for both safety and optimal heat distribution.
- Central Location: To maximize heating efficiency, place your stove in a central area of your home. This helps distribute the heat evenly throughout your living space.
- Clearance from Combustibles: Ensure the stove is placed a safe distance from combustible materials like furniture, curtains, or wooden walls. Most stoves require at least 36 inches of clearance from combustibles, though this can vary based on the stove model.
- Non-Combustible Wall Protection: If your stove is installed near a wall, protect it by installing a non-combustible heat shield. Materials like stone, tile, or brick can be used to reduce the risk of fire.
Carefully considering the stove’s placement will enhance both safety and heating efficiency. Caledonian Stoves can assist you in determining the best location for your stove and ensure compliance with safety guidelines.
Step 4: Install the Chimney or Flue System
Proper ventilation is key to the safe and efficient operation of a wood-burning stove. The chimney or flue system will remove smoke, gases, and particulates from your home.
- Existing Chimney: If your home has an existing chimney, you can likely connect your stove to it. Before doing so, have the chimney inspected and cleaned. You may need to install a stainless-steel flue liner to improve draft efficiency and reduce creosote buildup.
- New Flue System: If your home doesn’t have a chimney, you’ll need to install a twin-wall insulated flue system. This system can be routed either through the roof or an external wall.
- Chimney Height: For a proper draft, ensure that the chimney or flue extends at least three feet above the roofline. This will prevent smoke from backdrafting into your home.
If you’re unsure about what kind of chimney or flue system you need, Caledonian Stoves provides high-quality flue kits and components to meet your specific installation needs.
Step 5: Prepare the Hearth
The hearth is the non-combustible surface where your wood-burning stove will sit. It protects your floors from heat, sparks, and embers.
- Hearth Material: The hearth should be made from heat-resistant materials like stone, brick, concrete, or tile. These materials can withstand the high temperatures generated by the stove.
- Hearth Size: The hearth must extend at least 18 inches in front of the stove door and 12 inches on the sides. This ensures that stray embers won’t land on combustible flooring or other materials.
Caledonian Stoves offers a range of stylish hearth materials that can protect your home while adding aesthetic value to your living space.
Step 6: Install the Stovepipe
The stovepipe connects your wood-burning stove to the chimney or flue system. Proper installation is crucial to ensuring that smoke is safely vented outside your home.
- Fitting the Stovepipe: Attach the stovepipe securely to the stove’s flue collar and route it towards the chimney or flue system. Ensure the joints are tightly fitted, using stovepipe screws to secure each section.
- Sealing Joints: Apply high-temperature sealant to the stovepipe joints to prevent any smoke leaks.
For high-quality stovepipes and connectors, Caledonian Stoves has a variety of products to ensure a seamless and secure installation.
Step 7: Install Safety Detectors
Safety should always be a top priority when installing a wood-burning stove. Smoke detectors and carbon monoxide detectors are crucial for keeping your home safe from potential hazards.
- Smoke Detectors: Install smoke detectors near the ceiling, as smoke rises. Test them regularly to ensure they are functioning properly.
- Carbon Monoxide Detectors: Carbon monoxide is a colorless, odorless gas that can be deadly. Install carbon monoxide detectors at eye level, near the stove and other areas of your home.
Caledonian Stoves highly recommends installing these safety devices along with your stove for maximum protection.
Step 8: Test the Stove and Chimney
Once the installation is complete, it’s time to test your stove to ensure everything is working properly.
- Check for Leaks: Before lighting the stove, check the stovepipe and chimney connections for any leaks or gaps where smoke could escape.
- Test the Draft: Light a small piece of newspaper inside the stove to test the draft. If the smoke is drawn upwards into the chimney or flue, the draft is functioning correctly.
Step 9: Ongoing Maintenance
After the installation, regular maintenance is essential to keep your stove running efficiently and safely.
- Chimney Cleaning: Creosote, a highly flammable byproduct of wood combustion, can build up inside your chimney. Schedule an annual chimney cleaning to reduce the risk of chimney fires.
- Inspect Stovepipes: Regularly inspect the stovepipe for cracks, leaks, or signs of wear, and replace any damaged components as needed.
For chimney cleaning supplies and replacement parts, Caledonian Stoves offers a full range of products to help maintain your stove.
Conclusion
Installing a wood-burning stove in your home is a great way to enhance comfort, reduce heating costs, and improve energy efficiency. By following this guide, you can ensure a safe and successful installation process. Remember to check local regulations, properly ventilate the stove, and perform regular maintenance to keep your stove running smoothly.
Read More: menproject